Inspection Procedures: External Retaining Rings
Determining Permanent Set Limits for Basic External Retaining Rings
SH, VSH, SHI
1. Measure thickness (designated as “T” in specification charts) of the ring for adherence to specified tolerances.
2. Using a Rotor Clip retaining ring plier, separate the lugs until the ring barely fits over a shaft 1% larger than the nominal shaft diameter. Repeat this procedure four additional times using the same ring. Examine the ring for cracks.
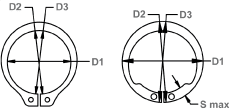
3. Measure ring diameter (D) in three directions as indicated below.
4. FOR SH AND VSH RINGS–Take the results of these three measurements and compute the average. Compare this figure to the minimum groove diameter listed in the specification chart for SH and/or VSH rings. If the average diameter after permanent set is less than the groove diameter, THEN THE RING IS FULLY FUNCTIONAL AND WILL PERFORM ACCORDING TO STATED SPECIFICATIONS:
Average Diameter < Minimum Groove Diameter (“Dg” in Spec Chart)
5. FOR SHI RINGS – Take the results of the three diameter measurements described in #3 above and compute the average. Measure the maximum section (“S.Max.” in the spec charts). Compare the average diameter minus 2 times “S Max” to the minimum groove diameter listed in the specification chart for SHI rings. If the average diameter minus twice the maximum section after permanent set is less than the groove diameter, THEN THE RING IS FULLY FUNCTIONAL AND WILL PERFORM ACCORDING TO STATED SPECIFICATIONS:
Average Diameter – 2S. Max. < Minimum Groove Diameter (“Dg” in Spec Chart)
More than Parts. A True Partnership.
Our passion is creating the best rings, springs, and clamps. Our mission is to make your work a success. We are here for you.
